How to use Unifi Cameras in Home Assistant after NVR being deprecated
- 6 minutes read - 1253 wordsUnifi deprecated their Network Video Recorder (NVR) in exchange for their new Unifi Protect system, and, for this last one, there’s no installer to deploy it in our own hardware, as you could do with the former Unifi Video. Now they only distribute it with their own hardware. We just bought a new big server for installing Home Assistant, NVR, the Unifi Controller, and some other applications for our local installation, so we didn’t want to buy more hardware that we didn’t really need. Today we will learn how to install the NVR and fix some installation issues, like the Java version you need to make it work inside Ubuntu 20.10.
Security warning: Unifi has not open-sourced their NVR software. The process I will explain here forces us to use an outdated and unmaintained Java version and the NVR itself. This has security implications, so it is highly recommended to isolate and protect this piece if you are going to use it in your internal network. So, don’t have open ports to the internet, and try to isolate this in a Virtual Machine with a private connection to your Home Assistant.
They have also deprecated the cloud platform that allowed us to see our cameras with a mobile app, without the need to have an IP address or a domain, nor opening ports in our system, and the new one is only available for the new Unifi Protect. Luckily, we use Home Assistant at home, so we already had this feature covered by their awesome mobile app, where we have a customized user interface to see the live camera streams. There’s still some functionality missing, like the ability to zoom the cameras, but we will talk about this in another post.
In order to access the cameras, we have several options. The simplest one is to completely forget about having an NVR, use the standalone mode of the cameras, and connect them directly to the Home Assistant through the RTSP protocol. But with this option, we lose the motion detection and recording capabilities of the NVR. If you don’t mind about these features, you can ignore the rest of this guide and use some form of this in your configuration:
camera:
    platform: generic
    name: mycam
    stream_source: rtsp://yourcamerauri
    verify_ssl: false
A second option is to install the NVR, following the next three steps to run this old version of the software. There are some other options, like using an OSS NVR like Shinobi, but we will talk about this in another post.
Step 1: pin the Java version in Ubuntu
The NVR software can be run on the latest Ubuntu versions, but it only works correctly when using the Java 8u275 version, so the standard Java 8 installer won’t work fur us, because the version used today is 8u282 and it is incompatible with NVR. We will need to do two things:
- Force the installation of an old Java version
- Avoid the automatic or manual updates when we run any
bash apt upgrade, because this will break the NVR.
The worst thing about the NVR error is that it won’t provide any information that your Java version does not work with it, you will only get a message that says …fail!, like in this example:
Feb 26 12:43:48 nvr systemd[1]: Starting LSB: Ubiquiti unifi-video...
Feb 26 12:43:49 nvr unifi-video[535]:  * Starting Ubiquiti UniFi Video unifi-video
Feb 26 12:43:50 nvr unifi-video[630]: (unifi-video) Hardware type:Unknown
Feb 26 12:43:50 nvr unifi-video[630]: (unifi-video) checking for system.properties and truststore files...
Feb 26 12:43:51 nvr unifi-video[535]:    ...fail!
Feb 26 12:43:51 nvr systemd[1]: Started LSB: Ubiquiti unifi-video.
The good news is that you can fix it, what we will do is:
- You need to manually download the Java 8u275 package:
wget https://packages.debian.org/stretch/amd64/openjdk-8-jre-headless/download
sudo apt install
openjdk-8-jre-headless_8u275-b01-1~deb9u1_amd64.deb
- And then we will label this version in our OS, to avoid that any apt upgrade run updates it to a newer version:
sudo apt-mark hold openjdk-8-jre-headless
Step 2: install NVR
Even though it is deprecated, Unifi has the last versions available for download. Installing NVR is not an easy task, because you need to install Mongo in a specific version, and also need some other OS tools. But you can use the install scripts by Glenn .R, that will take care of these details.
During the installation, you will be asked if you want to automatically update the Unifi software, but you don’t want automatic updates in this case. As the software is not maintained anymore, it will add some Debian sources that do not exist and will break the installer.
Once installed, we will have our NVR in an internal IP address that we will use to open a browser in port 7080. From the UI you will be able to discover, adopt and configure your cameras.
Last step: connect the NVR to the Home Assitant
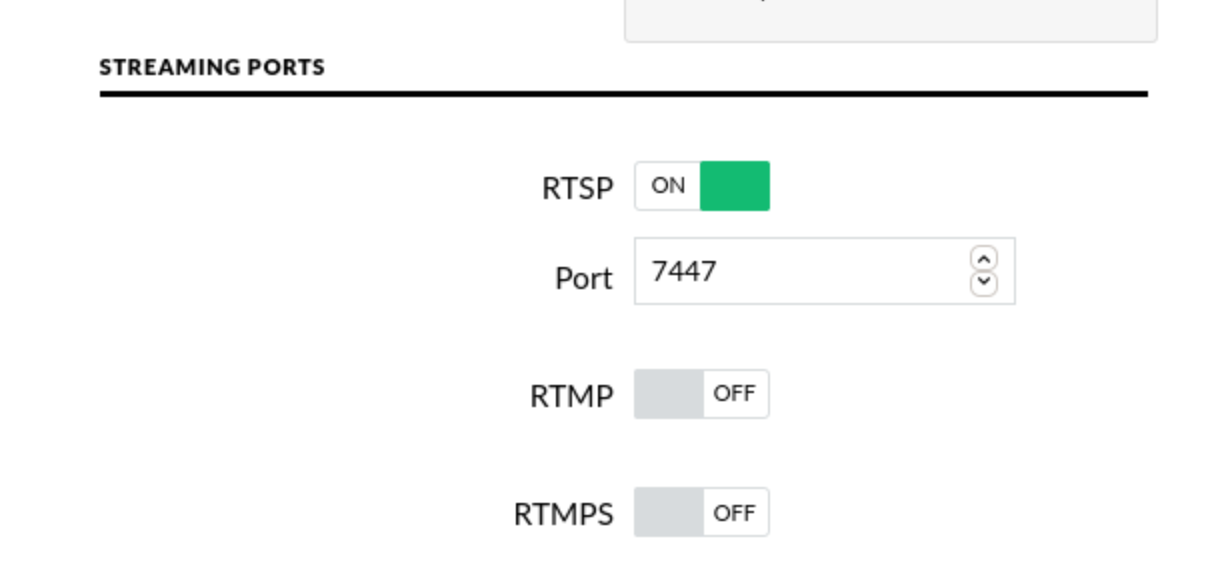
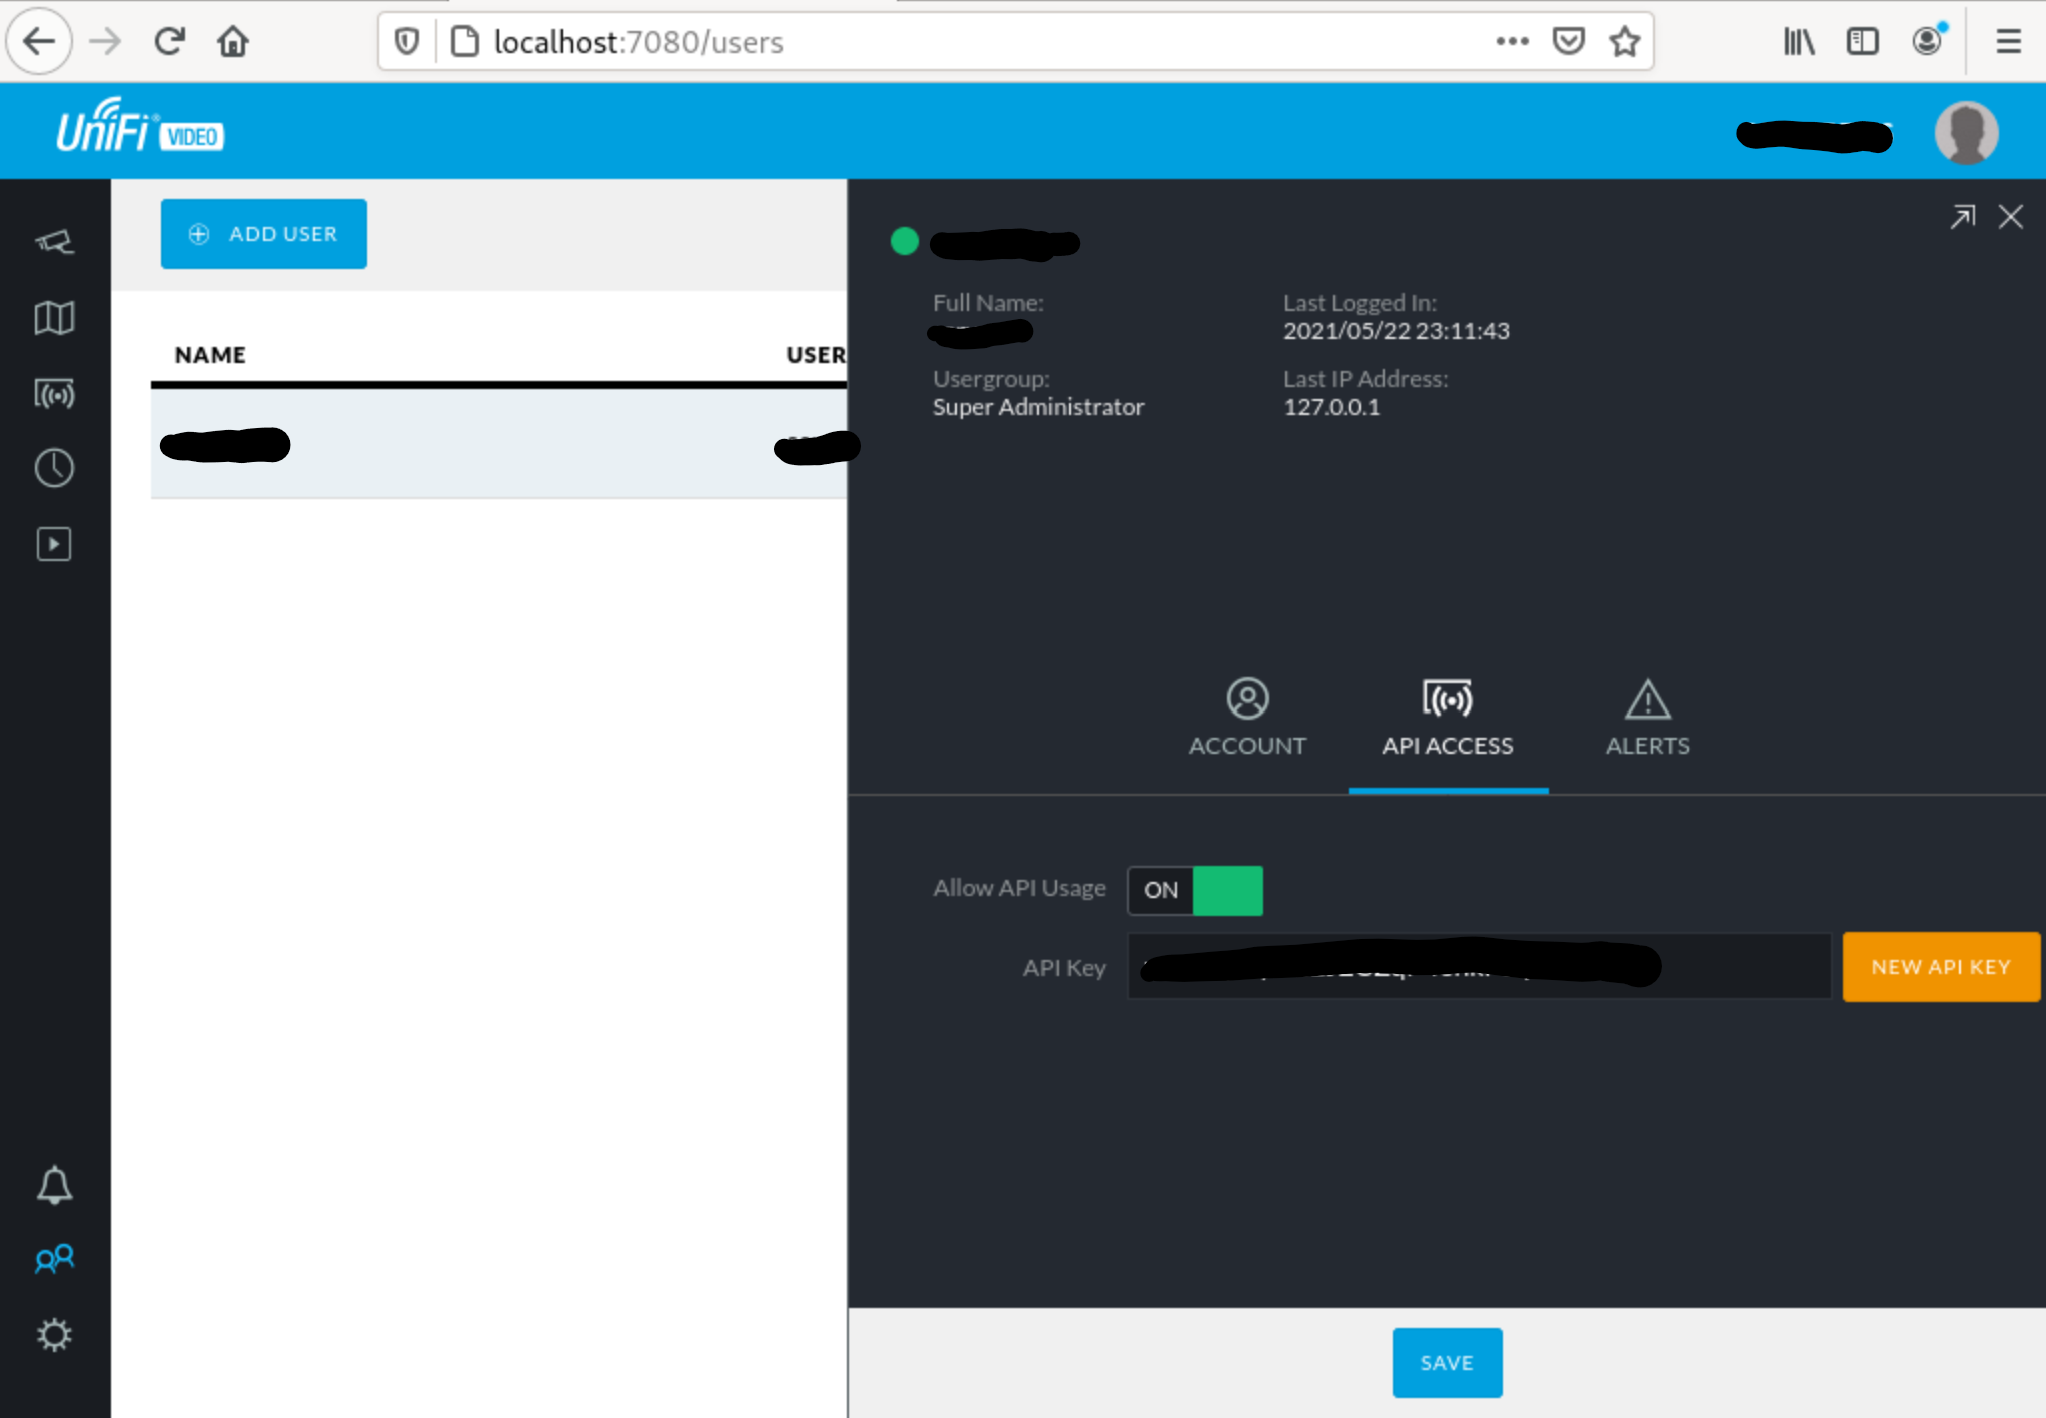
Once you have the cameras available in the NVR, you need to enable the RTSP streaming and obtain an API key. You can also write down the management password that the NVR creates for your cameras, but this last data is optional.
To configure the RTSP protocol in NVR, you can do it from the General Settings:

The API key is under the user config and you have to enable it as well:

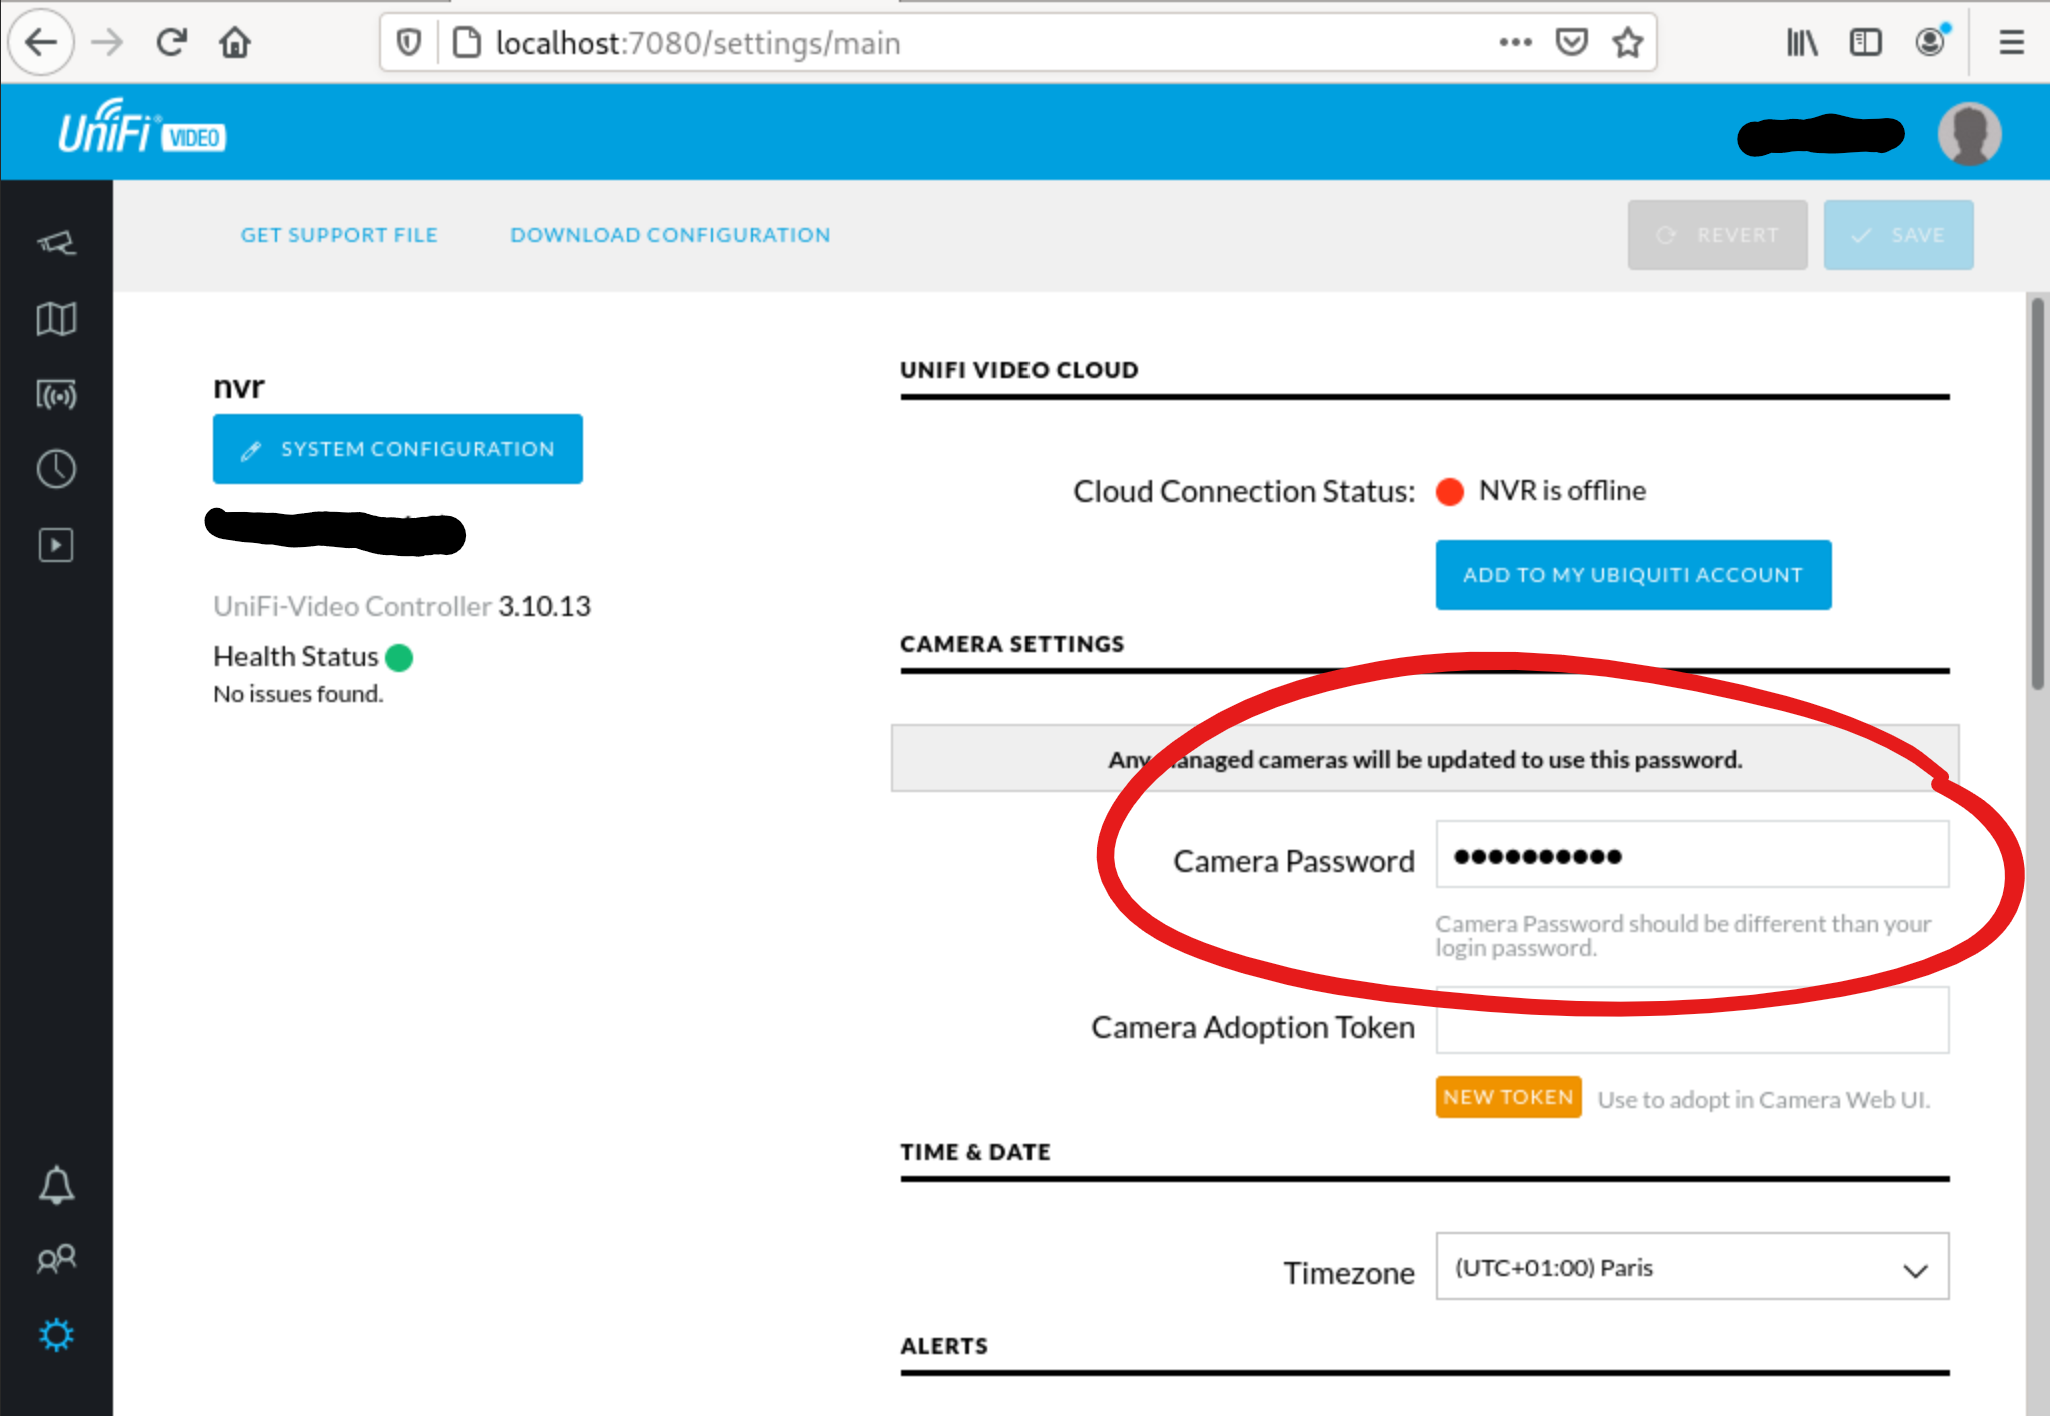
Additionally, we can also copy the password assigned by the NVR to manage the cameras. We can find this password in the general settings under “camera settings”. You need to click on the field to see the contents:

Lastly, in the Home Assistant general config file, we will use this data in the camera section. There’s an integration for the Unifi NVR called uvc:
camera:
  - platform: uvc
    nvr: [NVR IP]
    key: [API KEY]
    password: [CAMERA PASSWORD]
    ssl: [it is recommended to configure ssl]
Zero Trust: You may think, why do I need SSL in my own local network, but think about all the “SMART” devices you have at home connected to the same network: mobile phone, tv, vacuum cleaner or even your super-smart toaster with a java embedded program may be spying your network traffic without making any noise.
Once you restart Home Assistant you should see all the NVR cameras listed and available for your UI:

Additional interesting things
There are some other interesting features you can build when you have the Unifi Video NVR connected to Home Assistant:
- MQTT Motion events: you can generate MQTT events towards the Home Assistant to create some virtual sensors, for example, to execute an action or alert when motion is detected in a camera.
- Receive GIFs in Telegram: you can also generate small videos of the motion detection in GIF format to send them directly to Telegram as a Bot message.
- Video to Telegram: if your local Home Assistant is a small PC or Raspberry Pi, you may want to send the video to the cloud to convert it and send it to Telegram from Azure.
No future
As NVR is deprecated and there won’t be new versions nor bug fixes, this is only a temporary solution while we investigate alternatives that would also allow us to buy any camera. I hope I will a new post about how to use Open Source tools to create your own recorder and motion detection system, like Shinobi and other similar ones.
Link summary
- Home Assistant Mobile App
- Scripts to install NVR v3.10.13 by Glenn
- Home Assistant
- Java 8 275 package
- NVR End of Life
- Unifi protect
- Shinobi
- MQTT integration for Unifi Video
Credits
- Header picture by wiredforlego.